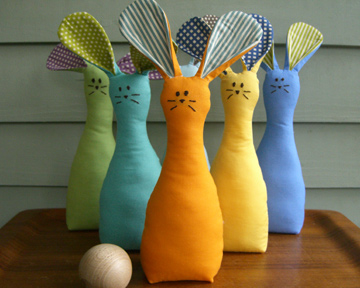
Whilst on the hunt for something fun for Easter, we found, and were bowled over by, these little gems from The Long Thread. Once you’ve finished adding these little critters to your collection hop on over to thelongthread.com and click here to check out their bunny round up: a list of adorable and easy-to-make Easter bunnies.
Supplies:
Cotton, twill or canvas, 27.9 x 27.9cm per bunny
Contrasting fabric for ears
Fusible interfacing, 23cm
Fabric Marker
Matching thread
Embroidery hoop (12.7cm or smaller)
Embroidery thread
Embroidery needle
Polyfill or other stuffing material
Funnel
Rice, 1/2 cup per bunny
Instructions:
- Prep the fabrics – wash, dry and press all fabric.
- Make your bunny smile – Cut one 14cm x 27.9cm piece of fabric for each bunny you are making. Mark 22.9cm up from the bottom in the centre of the fabric and use a fabric marker to draw the face. Place the fabric in a small embroidery hoop and sew the face.
- Snip, Snip – Cut out the paper templates. Fold over the fabric front with your bunny’s face lengthwise, aligning the bowling pin template with the bottom edge of the fabric. Be sure to place the face in the desired spot and cut out the shape. Cut the back of the bunny from the remaining fabric, cutting along the fold again. Cut the ear fronts from contrasting fabric and ear backs from solid fabric.
- Sew bunny’s ears – Iron fusible interfacing onto the back side of the bunny ear. Place the ear pieces right side out using a blunt tool. Fold the corners over towards the contrasting fabric and sew 0.6cm from the bottom to create a crease in the ears. Press flat.
- Sew your bunny– Place the ears upside down and rights sides facing up on the right side of the bunny back side (You may want to take another look at the diagram quickly). Fold ears and pin them in place, making sure that they are pinned out of the way of the seam allowance. Pin your bunny back to front, right sides together. With a 0.6cm seam allowance, sew along the outside edges and 2.5cm into either side along the bottom. Reinforce with an overcastting stitch, making sure all seams are secure.
- Make pleats in bottom – Pull the fabric at the corners to form a right angle in the opposite direction of the stitching. Press flat. Mark a line 1.9cm from the tip of the seam and sew along this line. Trim off excess fabric and reinforce with an overcastting stitch. Turn the bunny right side out.
- Stuff bunny – Using a funnel, stuff the bunny until it is ¾ full with polyfill or other stuffing. Make sure to pack the stuffing in tightly. Using the funnel, fill the remaining space with approximately ½ cup of rice.
Like us on Facebook or follow us on Twitter and stay up to date with the latest news and specials.
No comments:
Post a Comment